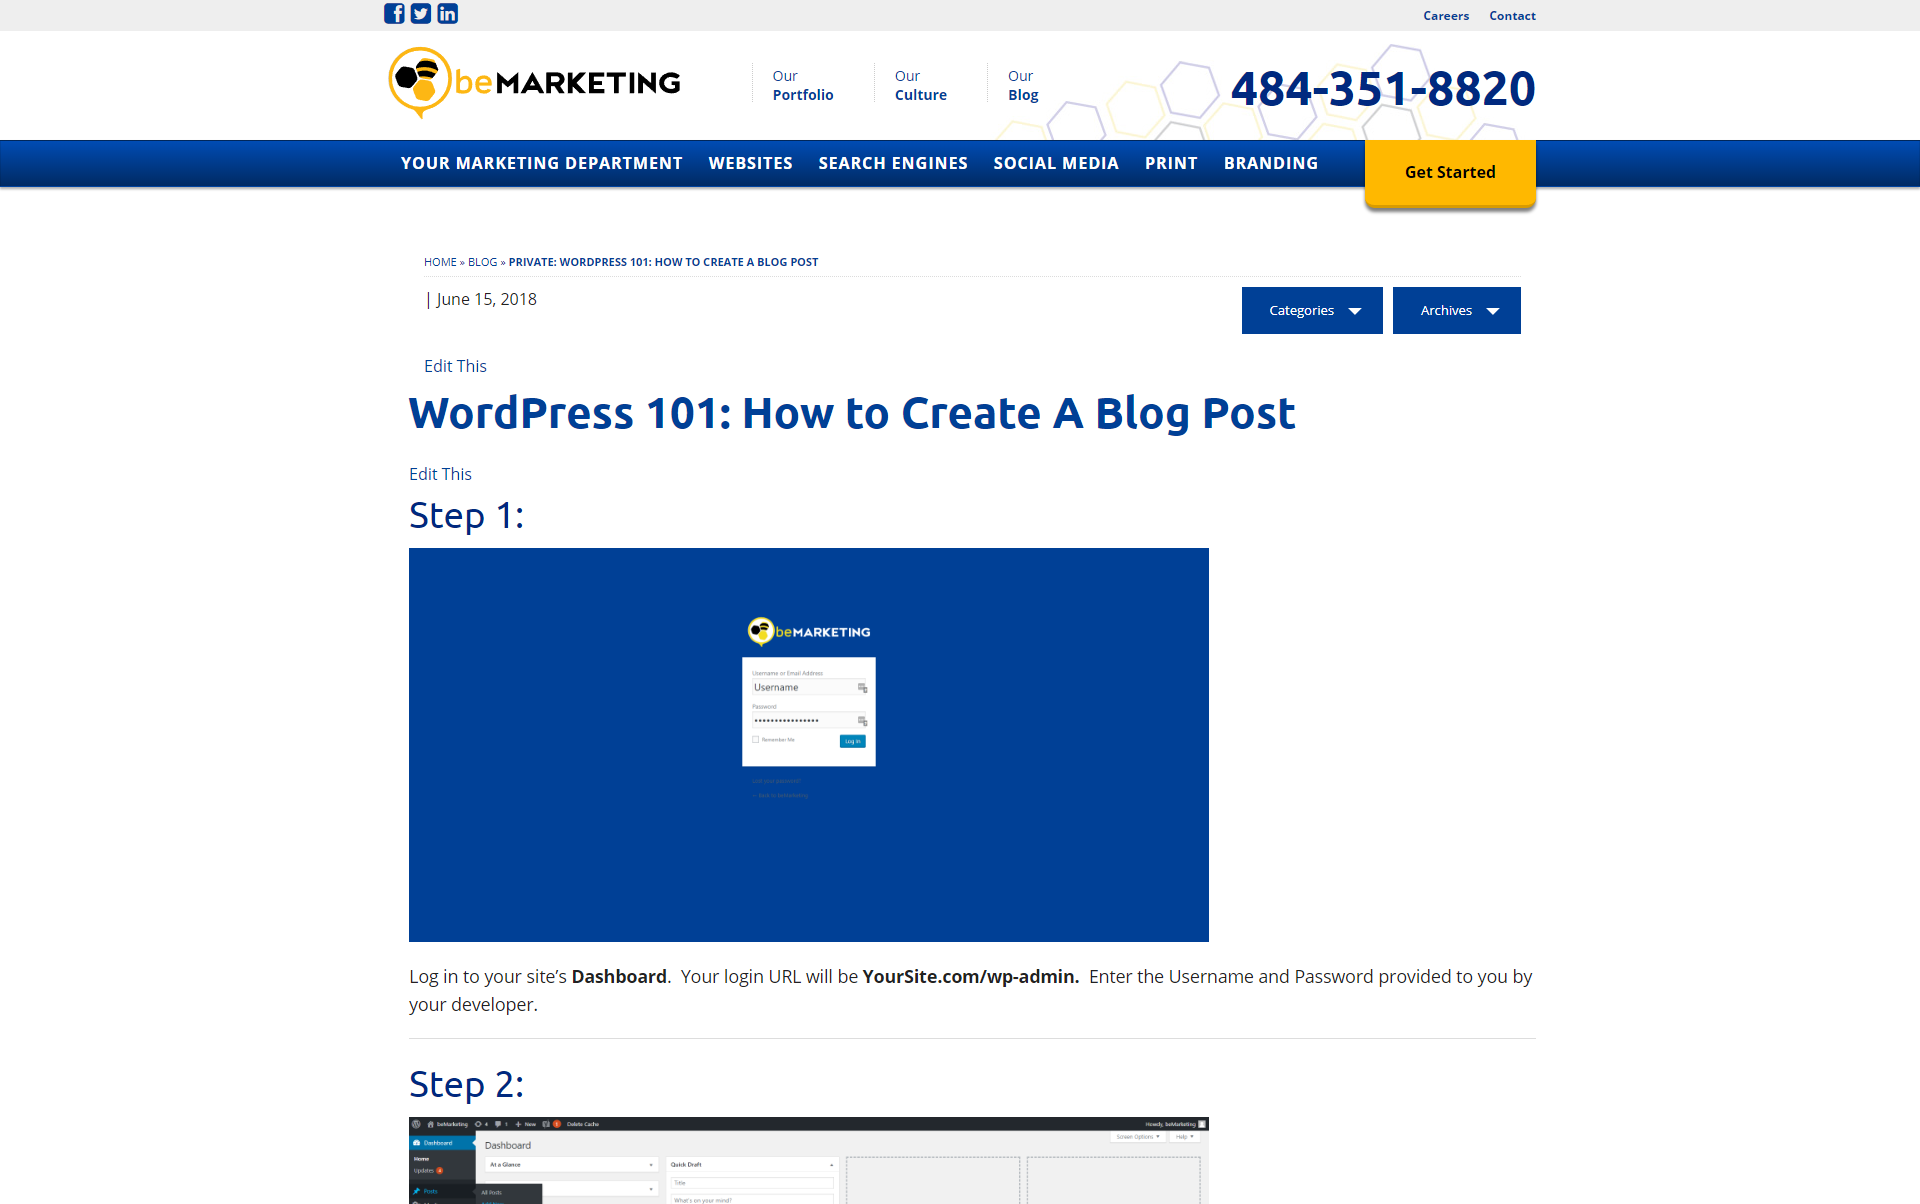
Skip to content
beMarketing Company Logo

Submit a Web Ticket

Linkedin-in Facebook-f Twitter Instagram
  • Home
  • Who We Help

    Who We Help

    Home Services

    • Electricians
    • HVAC
    • Landscapers
    • Movers
    • Painters
    • Pest Control
    • Plumbers
    • Restoration
    • Roofers

    Healthcare

    • Addiction Centers
    • Cardiologists
    • Chiropractors
    • Dentists
    • Family Doctors
    • Orthodontists
    • Othopaedic Offices
    • Healthcare Specialists
    • Urgent Care
    Hospitality
    Education Industry
    Retail
    Business Services
    Financial Institutions
    Automotive Industry
    Franchises
    Nonprofit Industry
    Legal
    Real Estate
  • How We Help

    How We Help

    Get More Leads Attract More Customers Build Your Brand Re-Engage Your Customers Track Your Results
    • Supercharge Online Presence Paid Search
    • Drive Organic Traffic Search Engine Optimization
    • Turn Mailboxes Into Profit Centers Direct Mail
    • Creative. Custom. Consistent Posting. Social Advertising
    • Transform Clicks Into Conversions Digital Campaigns
    • Become the Billboard Media Buying
    • Join the Conversation Social Media
    • Create Brand Trust Public Relations
    • Become a Go-To Source Content Marketing
    • Set the Stage for Success Creative Strategy
    • Drive Results with Engaging Designs Website Design
    • Help Your Brand Come To Life Video Marketing
    • Give a Gentle Nudge Remarketing
    • Keep the Conversation Going Email Marketing
    • Make Data Driven Decisions Real Time Reporting
  • Who We Are
    Careers
    Our Company
    Meet Our Team
    FAQs
    Blog
    The beCaring Project
  • Our Work
    Case Studies
    Portfolio
    Website Examples
  • Let's Talk
beMarketing Company Logo
  • Home
  • Who We Help
    • Home Services
    • Hospitality
    • Healthcare
    • Education Industry
    • Retail
    • Business Services
    • Financial Institutions
    • Automotive Industry
    • Franchises
    • Nonprofit Industry
    • Legal
    • Real Estate
  • How We Help
    • Get More Leads
    • Attract More Customers
    • Build Your Brand
    • Re-Engage Your Customers
    • Track your Results
    • Pricing Estimates
  • Who We Are
    • Careers
    • Our Company
    • Meet Our Team
    • FAQs
    • Blog
    • The beCaring Project
  • Our Work
    • Case Studies
    • Portfolio
    • Website Examples
  • Let’s Talk

WordPress 101: How to Create A Blog Post

  • beMarketing
  • June 22, 2018
  • Web Design, Web Development

Step 1: Log In

Log in to your site’s Dashboard. Your login URL will be YourSite.com/wp-admin. Enter the Username and Password provided to you by your developer.


Step 2: Add New Post

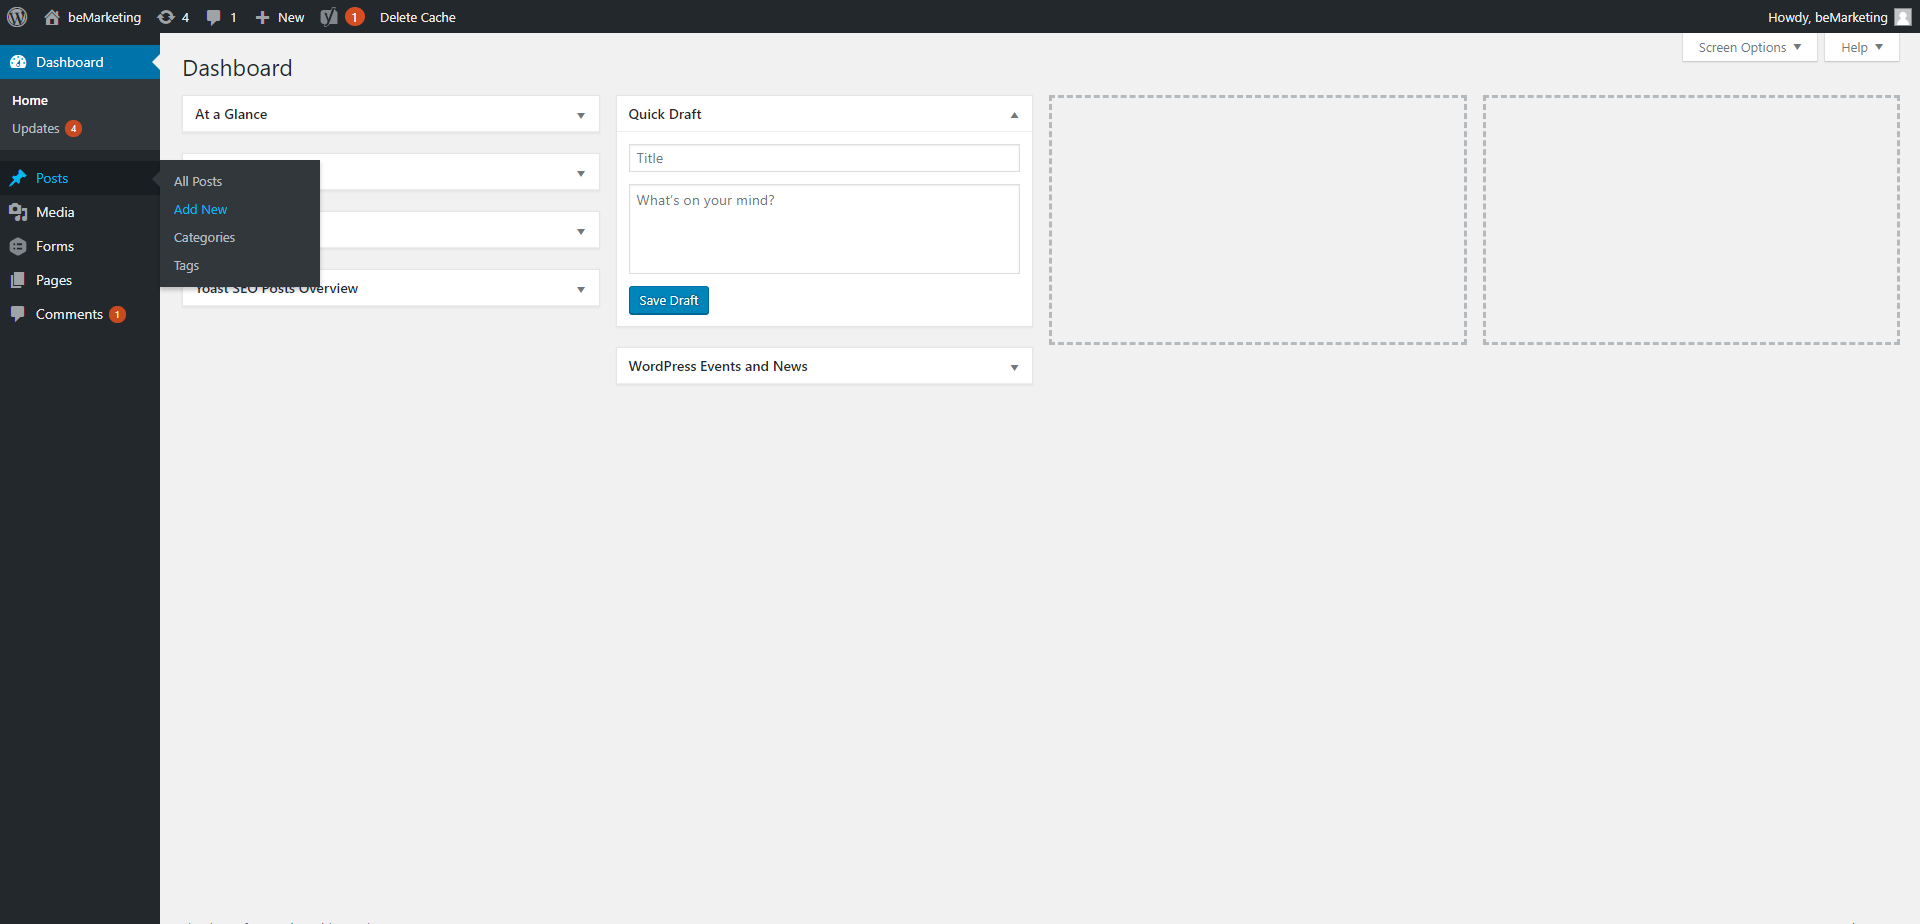
Welcome to your site’s WordPress Dashboard! On the left-hand side you will find many tools. To create a blog post, simply hover over Posts and select Add New.


Step 3:  Set Up Post

Let’s take a tour of this Add New Post screen.

  1. Post title
  2. Post URL:  The address at which readers can view your post.  You can open this link in a new tab or page any time to view your post (but not just yet – we still need to publish this post of yours).
  3. Visual/Text Editor toggle:  Most users will find the Visual editor more comfortable, and more feature-rich.
  4. Visibility Settings: You’ll want to choose these settings right off the bat.
    • Save Draft will save your post as you work, until you hit Publish for the first time and this option disappears.
    • Private keeps the post visible only to logged-in users (this is your best choice for a post you are still working on – you can set the post to Public when it is complete).
    • Password protected allows you to create a password to access the post. Keep in mind this post will still appear everywhere on your site that a fully published post would – it will just require a password to access the full text of the post.
    • Public will publish the post immediately, and visitors will be able to see your post even as you work on it.
  5. Publish Date: Publish your post in real time, or back-date it. You can also set a future date for publication, which will keep the post Private until that date/time arrives.
  6. Publish Button: This creates and saves your post. After the first save, it will become your Update button, which saves your work as you go. If you’ve selected Save Draft, this button will publish your post and it will no longer be a Draft.
  7. Categories: If your site has categories set up for posts, select the relevant categories here. Otherwise, it will default to Uncategorized.

Step 4:  Write and Style Content

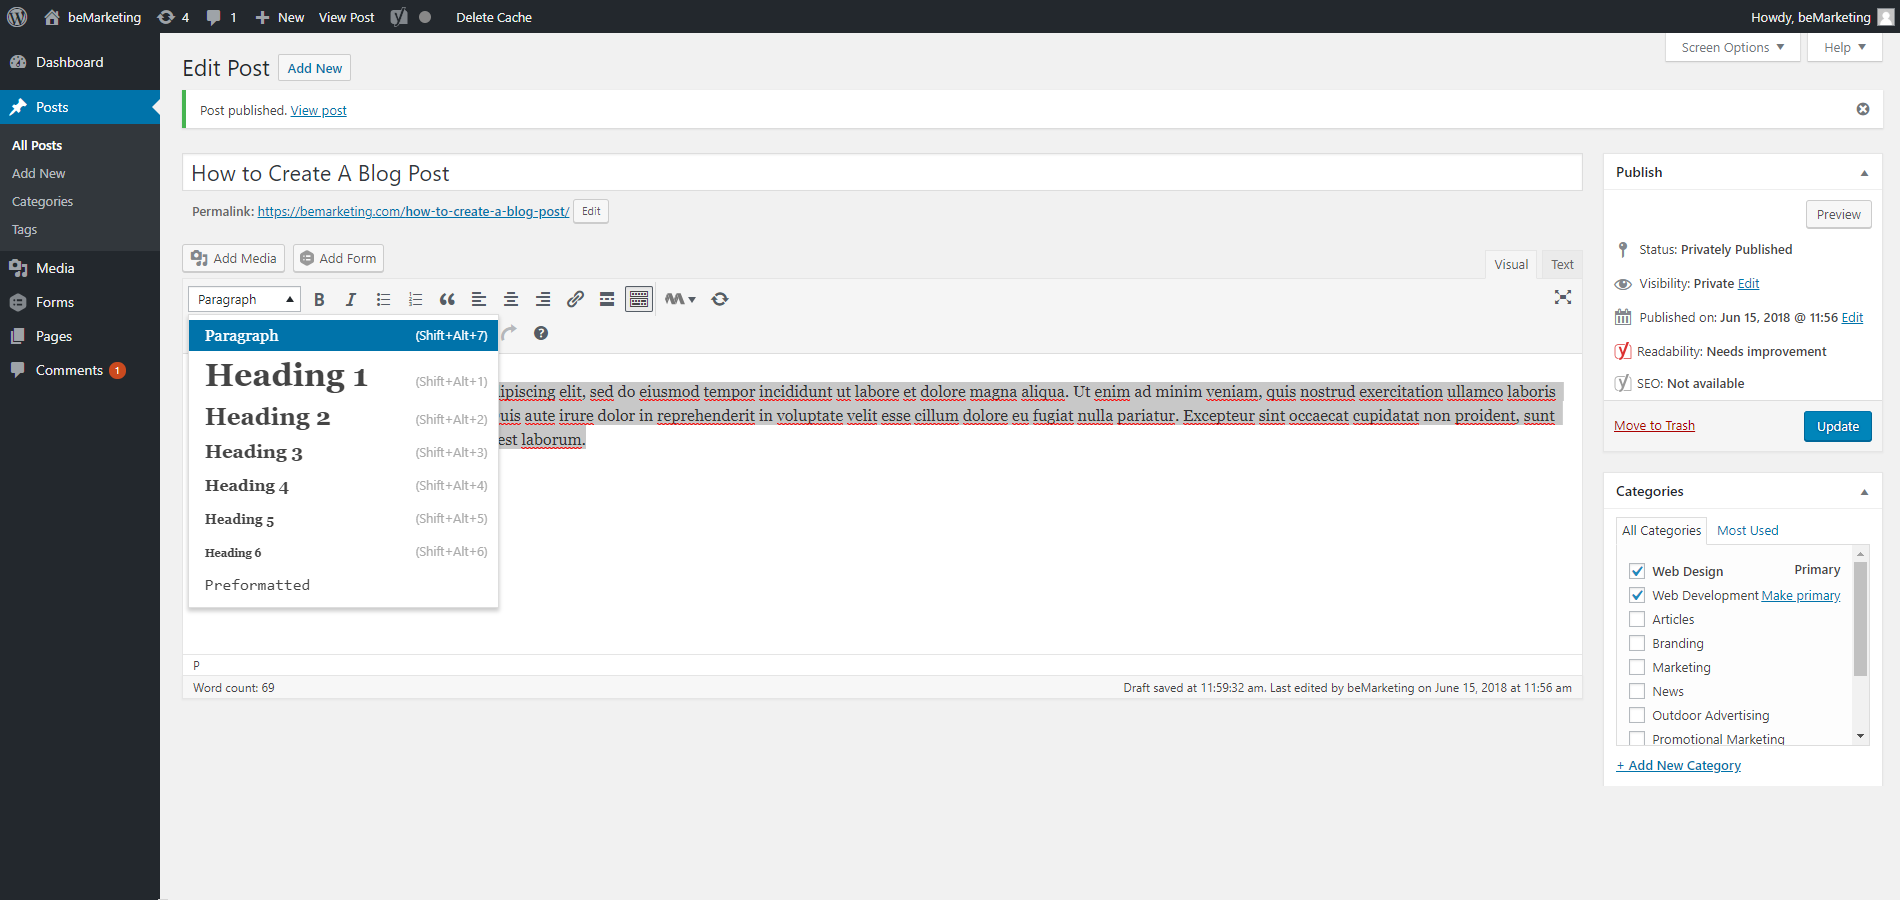
Let’s add content! Start filling in content, and explore the options in the Visual Editor to add styles to your text. Select text and choose a style from the drop-down – Paragraph, or Heading sizes 1-6. Some other styles to choose from:

    • Set text to Bold (B symbol)
    • Italic (I symbol)
    • Create a list with bullets or numbers
    • Create a Block Quote
    • Set text alignment
    • Add a link
    • Insert a Horizontal Line
    • Change text color
  • And more!

Blog posts with images are more engaging, so be sure to explore the Add Media button to add images from your Media Gallery or upload new images.


Step 5:  Add Featured Image

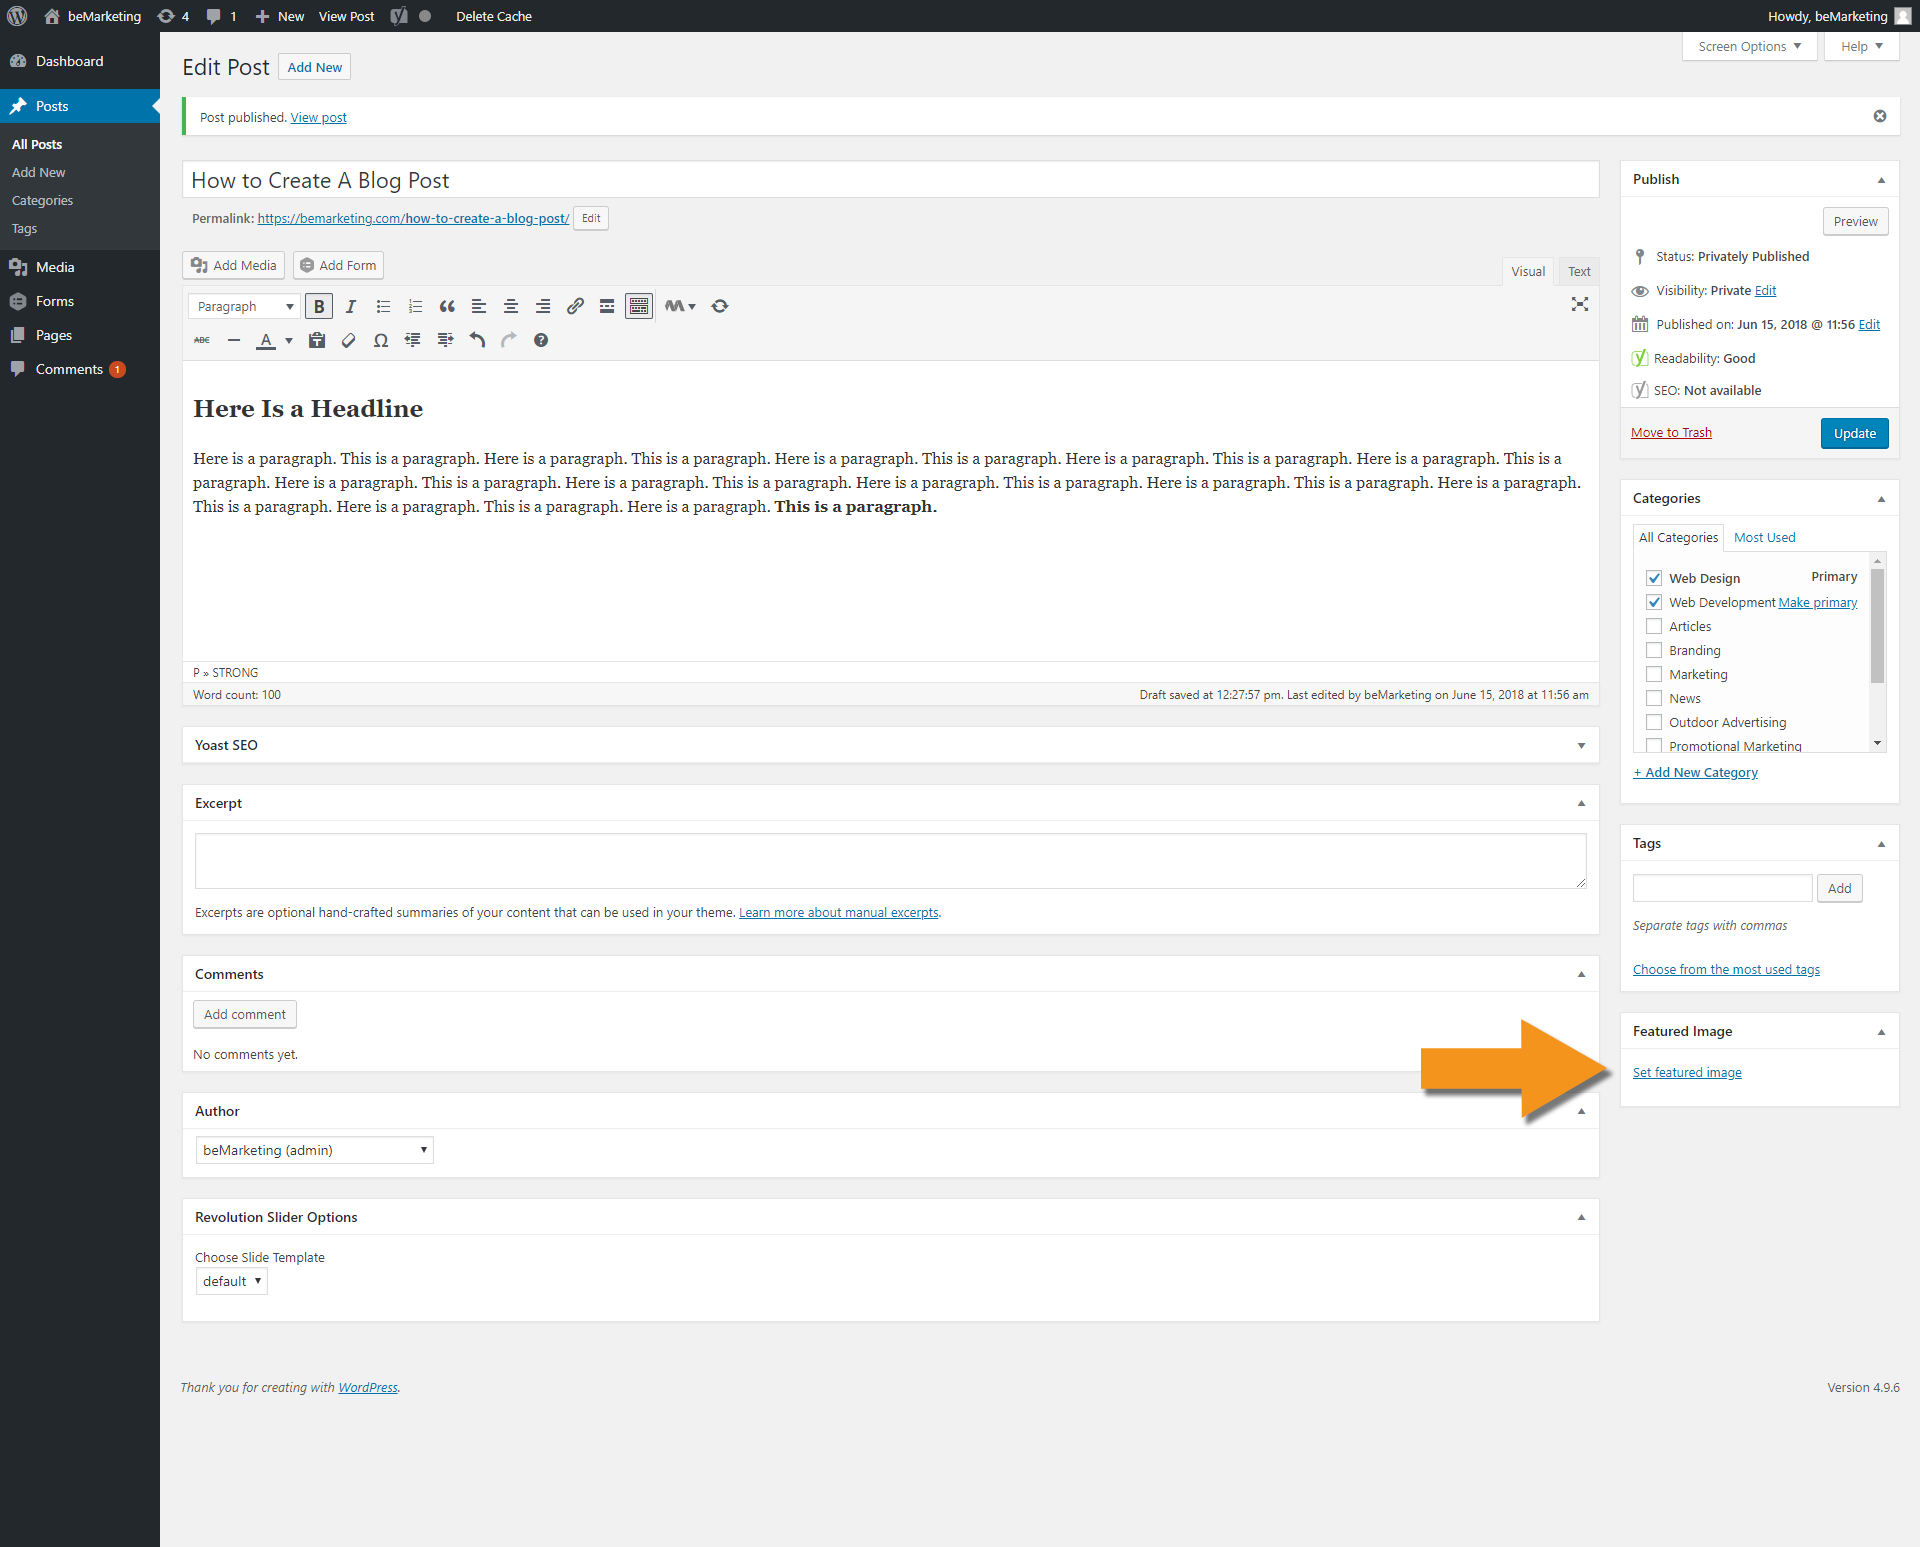
Let’s add a featured image to your post, which is the image that will appear on your Blog Page. Click Set Featured Image and select an image from your Media Gallery or upload a new photo. Below you can see how our featured image is looking on our beMarketing Blog Page! You’ll notice the title of our post says “Private:” as we have selected Visibility: Private for now.


Step 6:  Review and Publish

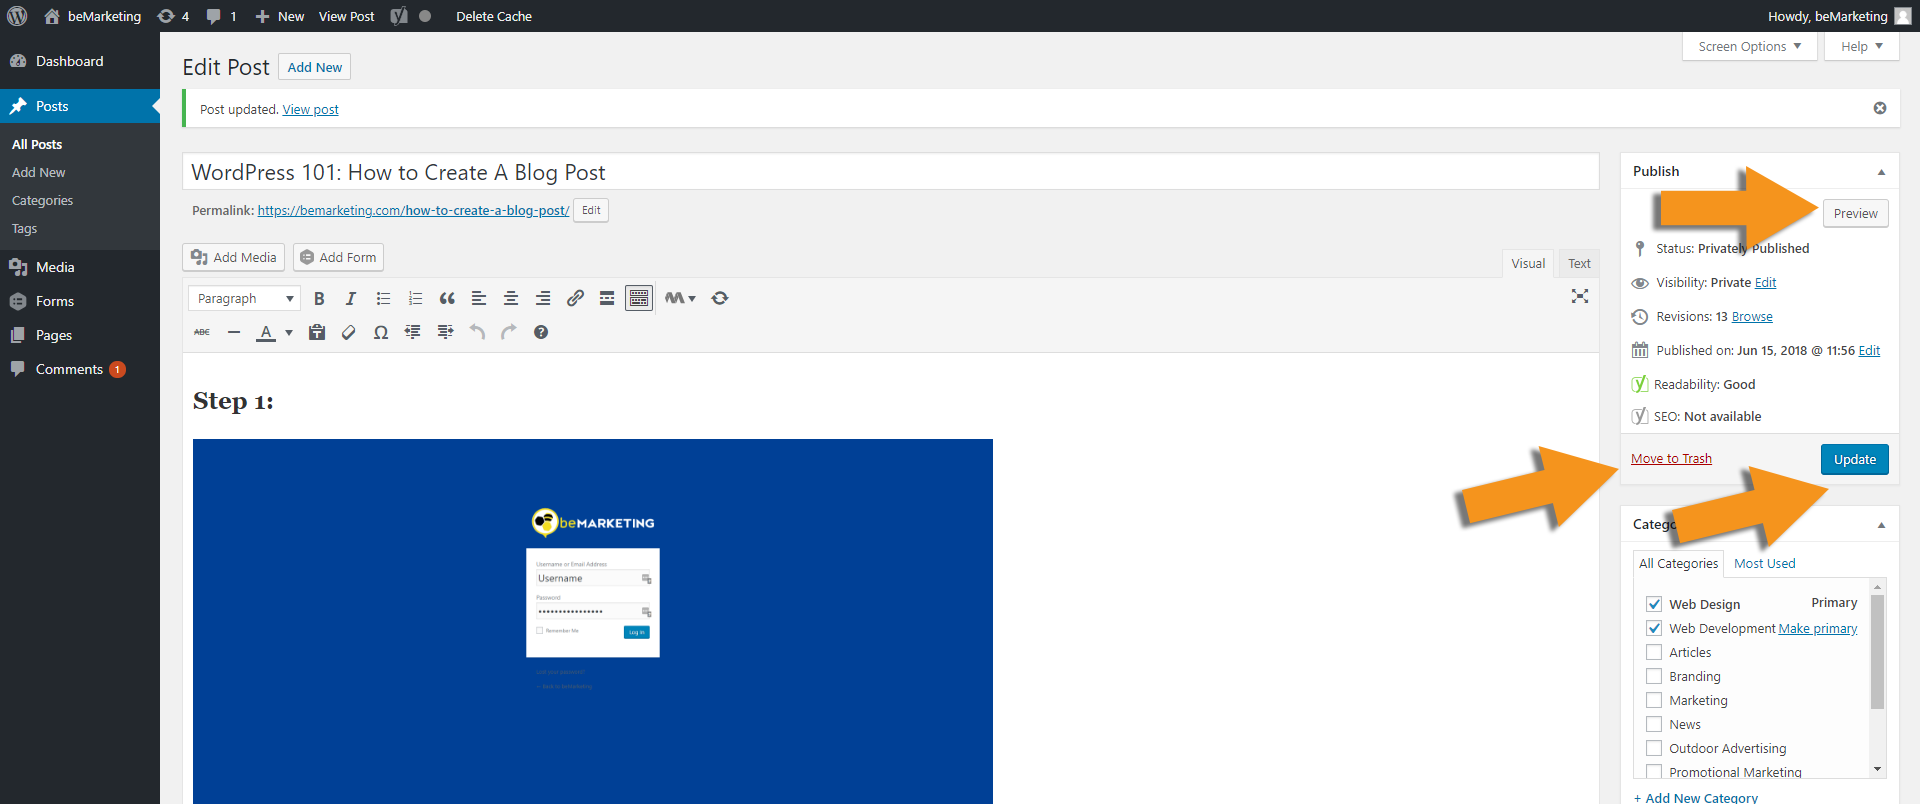
Time to review and publish your post. You can hit Preview to view your changes before Publishing or Updating your post. You can see I’ve changed the title of my blog post, and added photos and text.  Change your visibility settings to Public, double-check your Publication Date, and hit Update. Your post is now live, or scheduled for the publication date you selected! You can also click Move to Trash if you do not wish to save or publish this post.

Click the URL under Post Title to view your post, live on your site!

PrevPrevious2018 Web Design Trends
NextIs Your Website Mobile-Friendly?Next

Unlock Your Potential
& Achieve Your Goals

Dominate your online presence and promote brand awareness with our full-service digital marketing agency.
Collaboratively, we can implement innovative concepts, consult on a powerful strategy, and deliver an
incredible customer experience that delivers results and drives ROI.

Get Recognized

Who We Help

  • Home Services
  • Hospitality
  • Business Services
  • Healthcare
  • Real Estate
  • Retail
  • Nonprofit Industry
  • Legal
  • Education Industry
  • Automotive Industry
  • Home Services
  • Hospitality
  • Business Services
  • Healthcare
  • Real Estate
  • Retail
  • Nonprofit Industry
  • Legal
  • Education Industry
  • Automotive Industry

How We Help

  • Get More Leads
  • Attract More Customers
  • Build Your Brand
  • Re-Engage Your Customers
  • Track your Results
  • Pricing Estimates
  • Get More Leads
  • Attract More Customers
  • Build Your Brand
  • Re-Engage Your Customers
  • Track your Results
  • Pricing Estimates

Who We Are

  • Careers
  • Our Company
  • Our Team
  • FAQs
  • The beCaring Project
  • Careers
  • Our Company
  • Our Team
  • FAQs
  • The beCaring Project

Our Work

  • Case Studies
  • Portfolio
  • Website Examples
  • Case Studies
  • Portfolio
  • Website Examples
beMarketing Company Logo

Let's Talk

"*" indicates required fields

This field is for validation purposes and should be left unchanged.
Submit a Web Ticket

Copyright 2026 beMarketing. All Rights Reserved.

Linkedin-in Facebook-f Twitter Instagram